
How to Install Plastic Poultry Slatted Flooring Quickly and Efficiently
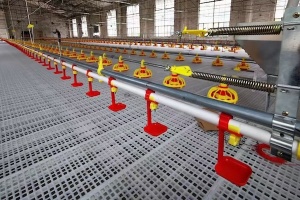
For commercial poultry farmers and small-scale backyard breeders alike, plastic poultry slatted flooring is a game-changing solution for cleaner coops, lower disease risk, and simplified manure management. Unlike flimsy temporary mats or labor-intensive wooden slats, these heavy-duty polypropylene panels feature interlocking edges, non-slip surfaces, and precision-sized slits that let waste drop through effortlessly while supporting poultry weight without bending. Installing this durable flooring doesn’t require advanced construction skills or expensive tools; with a straightforward, step-by-step approach, you can cover entire poultry house floors in hours instead of days, cutting downtime and getting your flock back to a safe, hygienic space quickly.
D'abord, prep the installation area thoroughly to avoid delays mid-project. Start by clearing the poultry house of all bedding, mangeoires, waterers, and loose debris. Sweep or power-wash the floor surface, then let it dry completely; moisture or uneven dirt can create gaps between panels and weaken the overall structure. Suivant, measure the length and width of the space to calculate the exact number of panels needed, and lay all panels, support beams, and fasteners out in an organized stack near the work zone. This pre-planning step eliminates constant trips for supplies and keeps the workflow smooth from start to finish.
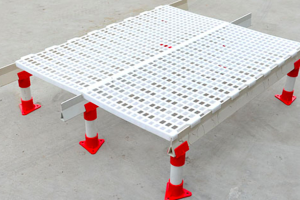
Once the area is prepped, set up the support system first, as it forms the stable base for the slatted panels. For most standard poultry setups, use corrosion-resistant metal or heavy-duty plastic support beams spaced 18 à 24 inches apart; this spacing ensures optimal weight distribution and prevents panel sagging over time. Secure the beams to the floor or existing framework with heavy-duty screws, making sure each beam is level and evenly aligned. Take a minute to double-check levelness with a bubble level—small misalignments now will lead to wobbly panels and premature wear later, so this quick check saves long-term hassle.
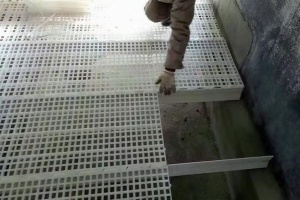
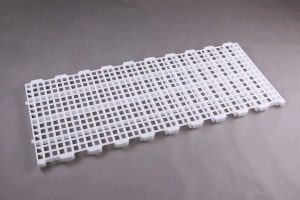
With supports in place, begin laying the interlocking plastic panels, starting at one corner of the poultry house and working outward. Each StoutAgri slatted panel is designed with a male-female interlock system, so simply align the edge tabs of one panel with the grooves of the next, then press firmly or tap gently with a rubber mallet to lock them into place. Avoid using metal hammers, as they can crack or scratch the durable plastic surface. Continue this pattern row by row; the interlock design eliminates the need for messy adhesives or excess fasteners, drastically speeding up the process.
After covering the full floor space, trim any edge panels to fit uneven corners or narrow gaps using a fine-tooth plastic saw. Most panels cut cleanly without splintering, so this step is quick and requires minimal effort. Once all panels are fitted, secure the outer edges to the support beams with a few heavy-duty plastic clips to prevent shifting when poultry moves across the surface. This final securing step takes just minutes but adds long-term stability to the entire flooring system.
Enfin, do a quick post-install check to ensure all panels are locked tight, supports are secure, and there are no sharp edges or gaps that could harm birds. Within minutes, you can replace feeders and waterers, and your poultry house will be ready for use. Choisir la qualité, easy-install plastic slatted flooring from StoutAgri means you skip the lengthy installation of traditional flooring options, gain a low-maintenance, long-lasting surface, and create a healthier environment for your flock. This fast, efficient installation process makes it ideal for retrofitting old coops or setting up new poultry operations without extended downtime.