
The Significance of a Properly Assembled Double – Alimentatori per suini laterali
A correctly assembled pig – use stainless steel double – sided feeders play a vital role in optimizing the feeding process. It can help ensure that pigs have easy access to feed, minimize feed spillage, and promote a clean and hygienic feeding environment. Questo, in turn, contributes to better – growing rates, reduced disease risks, and ultimately, higher yields for pig farmers.
What is a Pig – Use Stainless Steel Double – Sided Feeder?
A pig – use stainless steel double – sided feeder is a specialized feeding equipment designed specifically for pigs. As the name implies, it is made of stainless steel, a material known for its durability, corrosion resistance, e facile – A – clean properties. These characteristics make it ideal for use in the often – harsh and humid environment of pig farms.
Il doppio – sided design is another key feature of this feeder. It allows pigs from two adjacent pens or areas to feed simultaneously. This not only saves space but also increases the efficiency of the feeding process. Per esempio, in a large – scale pig farm with multiple pens, a single dual – sided feeder can serve two groups of pigs, reducing the need for multiple individual feeders.
These feeders come in various sizes and configurations to accommodate different numbers of pigs and different farming setups. Some models have adjustable feed levels, allowing farmers to control how much feed is available to the pigs at any given time. This is particularly useful for managing the growth and nutrition of pigs at different stages of their development, such as piglets, growing pigs, and sows. Inoltre, the smooth surface of the stainless – steel construction helps prevent feed from getting stuck or caked, ensuring that the pigs always have access to fresh and clean feed.
Tools and Materials Needed
Tools
Before you start assembling your pig – use stainless steel double – sided feeders, you need to gather the right tools. Here are the essential ones:
- Screwdriver: A screwdriver is crucial for tightening and loosening screws. There are two main types you might need – a Phillips – head screwdriver for cross – recessed screws and a flat – head screwdriver for slotted screws. When choosing a screwdriver, make sure the tip fits the screw head precisely. Per esempio, if the tip is too small, it can strip the screw head, making it difficult to remove or tighten. To use a screwdriver, place the tip firmly into the screw head and turn it clockwise to tighten and counter – clockwise to loosen.
- Wrench: Wrenches are used for tightening nuts and bolts. For a pig feeder assembly, an adjustable wrench can be very handy as it can fit different sizes of nuts and bolts. Tuttavia, if you know the exact sizes of the fasteners in your feeder kit, a set of open – end or box – end wrenches might provide more precise control. When using a wrench, place the jaws of the wrench firmly around the nut or bolt and apply steady pressure in the appropriate direction. If the nut or bolt is stubborn, do not apply excessive force all at once as it can damage the fastener or the wrench; instead, try tapping the wrench gently to loosen it first.
- Level: A level, such as a bubble level, is essential to ensure that the feeder is installed horizontally. This is important because an uneven feeder can cause feed to accumulate on one side, leading to uneven feeding among the pigs. Place the level on the feeder surface at different points during the installation process. If the bubble is not centered, adjust the position of the feeder until the bubble is exactly in the middle, indicating a level surface.
- Measuring Tape: You’ll need a measuring tape to accurately measure the distance between mounting points, the height at which the feeder should be installed, and the length of any additional components that might need to be cut to fit. Measuring accurately helps in proper alignment and ensures that all parts fit together correctly. Per esempio, when installing the feeder at a specific height from the ground, measure from a fixed reference point on the wall or floor using the measuring tape.
Materials
In addition to the components of the pig – use stainless steel double – sided feeders itself, you’ll need the following materials:
- Screws, Nuts, and Washers: These are the fasteners that hold the feeder together. It’s important to use the correct size and type of screws and nuts. For a stainless – steel feeder, stainless – steel screws and nuts are recommended as they have similar corrosion – resistance properties. Washers, d'altra parte, help distribute the load when tightening the screws, preventing the screws from digging into the feeder material and providing a more secure connection. Per esempio, flat washers are placed under the head of the screw or nut, while lock washers can be used to prevent the fasteners from loosening over time.
- Mounting Brackets or Hardware: Depending on how you plan to install the feeder (e.g., on a wall, fence, or stand), you may need mounting brackets. These brackets should be made of a sturdy material, such as galvanized steel, to withstand the weight of the feeder and the force exerted by the pigs. If the feeder comes with pre – drilled holes for mounting, ensure that the mounting hardware you use is compatible with these holes in terms of size and thread type.
- Sealant (Optional): If there are any joints or connections in the feeder where water or feed might leak, a food – grade sealant can be used. This is especially important in a wet or humid pig – farming environment. A sealant helps maintain the integrity of the feeder, prevents feed from spilling out, and reduces the risk of mold or bacteria growth in hard – A – clean areas. Tuttavia, make sure to choose a sealant that is safe for use around animals and food.
Step – presso – Step Assembly Process
Step 1: Prepare the Work Area
Before starting the assembly, choose a clean and flat work area. This could be a dedicated workshop in the pig farm or a clear space in a barn. Ensure that the area is free from debris, dirt, and any potential tripping hazards. Also, make sure there is enough light, either natural or artificial, so that you can clearly see the parts and the assembly process. Safety is crucial, so wear appropriate safety gear, such as work gloves to protect your hands from sharp edges on the stainless – steel parts. If possible, lay down a protective mat to prevent the feeder parts from getting scratched during assembly.
Step 2: Unpack and Inspect the Parts
Carefully unpack the pig – use stainless steel double – sided feeders. Check the packing list to ensure that all parts are present. The typical parts include the base components, front and rear baffles, dividers, feed control device, e anti – deformation support rods. Visually inspect each part for any signs of damage, such as dents, scratches, or missing holes. Per esempio, the stainless – steel plates should be free from rust spots and have smooth edges. If you find any damaged parts, contact the supplier immediately for a replacement. It’s better to address these issues at the beginning rather than during the assembly process.
Step 3: Assemble the Base
Begin by assembling the base of the feeder. Primo, lay out the bottom chassis. This is usually a large, flat stainless – steel plate. Poi, attach the side panels to the chassis using the provided screws and nuts. Make sure to align the pre – drilled holes accurately. Start with one side panel, insert the screws through the holes in the chassis and the side panel, and then secure them with nuts. Use a screwdriver and a wrench to tighten the fasteners firmly. Repeat the process for the other side panel. Check the alignment of the side panels with the chassis; they should be perpendicular to the chassis for a stable base.
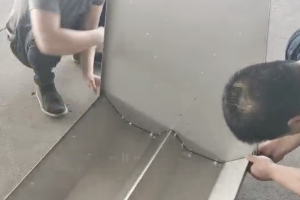
Step 4: Install the Front and Rear Baffles
Prossimo, install the front and rear baffles. These baffles help contain the feed and prevent it from spilling out of the feeder. Place the front baffle in position at the front end of the assembled base. Align the holes in the baffle with the holes on the base. Insert screws through these holes and tighten them to secure the baffle. Do the same for the rear baffle. When installing the baffles, make sure they are flush with the sides of the base and are firmly attached. This will ensure that the feeder can hold the feed properly and that pigs can’t push the feed out from the sides.
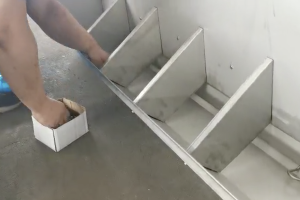
Step 5: Insert the Dividers
The dividers in the feeder help separate the feed area into smaller sections, which is beneficial for pigs to feed in an organized manner. Take the dividers and insert them into the slots or holes provided in the feeder. The dividers should fit snugly. They prevent pigs from overcrowding at one feeding point and also help in reducing feed waste. Each section created by the dividers can be accessed by a few pigs at a time, promoting a more balanced and efficient feeding process.
Step 6: Set Up the Feed Control Device
The feed control device is an important part of the feeder as it allows you to regulate the amount of feed dispensed. Locate the feed control device in the parts kit. It usually consists of a control rod and an adjustment mechanism. Insert the control rod through the appropriate holes in the feeder, making sure it moves freely. Poi, attach the adjustment mechanism to the end of the control rod. This mechanism might have different settings or notches that you can use to adjust the amount of feed that is released. Per esempio, if you want less feed to be available at a time, adjust the mechanism to a lower setting. Test the feed control device by moving the control rod back and forth to ensure it functions smoothly.

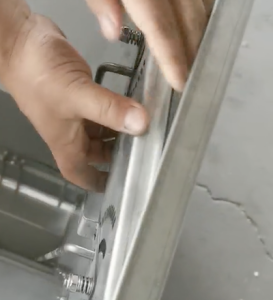
Step 7: Add the Anti – Deformation Support Rods
Finalmente, install the anti – deformation support rods. These rods are crucial for maintaining the shape and integrity of the feeder, especially considering the rough usage in a pig farm environment. Locate the holes or brackets on the feeder where the support rods are to be installed. Insert one end of the support rod into the hole or attach it to the bracket on one side of the feeder. Poi, stretch the rod across and attach the other end to the corresponding hole or bracket on the opposite side. Tighten any fasteners or connectors to secure the support rod in place. The anti – deformation support rods help prevent the feeder from bending or deforming under the weight of the feed or the force exerted by the pigs, thus significantly extending the feeder’s service life.
Tips for a Smooth Assembly
Read the Instructions Thoroughly
Before you even touch a tool, take the time to read the assembly instructions carefully. These instructions are your roadmap to a successful assembly. Start by skimming through the entire manual to get a general idea of the process. Poi, go back and read each step in detail. Pay close attention to any diagrams, illustrations, or notes provided. Per esempio, some instructions might highlight specific parts that are easy to misplace or steps that require extra care. Make sure you understand the sequence of assembly; some parts need to be installed in a particular order for the feeder to function properly. If there are any terms or concepts you don’t understand, look them up or contact the manufacturer for clarification. This initial investment of time in reading the instructions can save you hours of frustration later on.
Keep the Parts Organized
As you unpack the pig – use stainless steel double – sided feeders, keep the parts organized. Sort the screws, nuts, washers, and other small components into separate containers or trays. You can label these containers to make it easier to find the right part when you need it. For the larger parts, lay them out in the order they will be used in the assembly process. This way, you won’t waste time searching for a part in the middle of the assembly. Ad esempio, keep the base components together in one area, the baffles in another, and the support rods in a third area. If there are multiple parts that look similar, mark them with a piece of tape or a small label to distinguish between them. This organization not only speeds up the assembly but also reduces the risk of losing parts.
Check and Re – check Connections
After you’ve assembled each section of the feeder, take a moment to check the connections. Give each joint a gentle tug or shake to make sure the parts are firmly attached. For screws and nuts, use a screwdriver or wrench to double – check that they are tightened properly. Over – tightening can damage the parts, while under – tightening can lead to a wobbly feeder that may come apart over time. If you’re using a sealant, inspect the sealed areas to ensure there are no gaps or leaks. During the final assembly, check the overall stability of the feeder. Place it on a flat surface and see if it stands level and doesn’t rock from side to side. Making these checks throughout the assembly process can prevent problems from arising when the feeder is in use, ensuring that it serves its purpose effectively for a long time.
Common Assembly Mistakes and How to Avoid Them
Incorrect Screw Tightening
One of the most common mistakes during the assembly of pig – use stainless steel double – sided feeders is incorrect screw tightening. Over – tightening the screws can cause the stainless – steel parts to warp or crack. Since stainless steel is a strong material, applying excessive force with a screwdriver or wrench can put undue stress on the holes and the surrounding area of the parts. Per esempio, if you overtighten the screws that attach the side panels to the base, the side panels might bend, which can affect the overall shape and stability of the feeder. This not only makes the feeder look unprofessional but also reduces its functionality as it may not hold feed properly or could be more prone to damage from the pigs’ movements.
On the other hand, under – tightening the screws is equally problematic. Loose screws can cause the feeder to become wobbly. As the pigs feed, they will push and nudge the feeder, and if the screws are not tight, the parts can come loose over time. This can lead to the feeder falling apart during use, which is not only a safety hazard for the pigs but also means you’ll have to stop the feeding process and reassemble the feeder, causing inconvenience and potential feed waste.
To avoid these issues, use the right – sized tools and apply the appropriate amount of force. Start by hand – tightening the screws to get them in place. Poi, use a screwdriver or wrench to gradually tighten them. You can use a torque – wrench if you want to be more precise, especially if the feeder comes with specific torque requirements. A good rule of thumb is to tighten the screws until they are snug but not overly tight. After tightening all the screws, give the feeder a gentle shake to check for any loose parts. If you feel any movement, go back and tighten the relevant screws a bit more.
Misaligned Parts
Another frequent error is misaligning the parts during assembly. This can happen when the pre – drilled holes in the different components of the feeder don’t line up correctly. One reason for misalignment could be that the parts were not unpacked and laid out properly at the beginning. If the parts are jumbled together, it’s easy to start assembling them in the wrong orientation. Per esempio, when attaching the front baffle to the base, if you don’t align the holes carefully, the baffle might be crooked. This can prevent the feeder from functioning as intended. Feed could leak out from the gaps created by the misaligned baffle, and the pigs may not be able to access the feed evenly.
To solve this problem, take your time during the initial inspection and layout of the parts. Make sure you understand how each part should fit together by referring to the assembly instructions and diagrams. If you notice that the holes are not aligning, don’t force the parts together. Instead, double – check the orientation of the parts. A volte, a part might need to be rotated or flipped to get the holes to line up correctly. If the misalignment seems to be due to a manufacturing defect, such as holes being drilled in the wrong place, contact the supplier immediately. They can provide you with a replacement part or offer guidance on how to correct the issue.
Skipping Steps
Skipping steps in the assembly process is a mistake that can have serious consequences for the functionality and durability of the pig – use stainless steel double – sided feeders. Each step in the assembly instructions is designed to ensure that the feeder is put together correctly. Per esempio, if you skip the step of installing the anti – deformation support rods, the feeder may not be able to withstand the weight of the feed or the force exerted by the pigs. Col tempo, this can cause the feeder to bend or collapse, leading to costly repairs or the need to replace the entire feeder.
Some people might skip steps thinking they can save time, but in the long run, it often leads to more time spent fixing the problems that arise. To avoid skipping steps, always follow the assembly instructions in order. Check off each step as you complete it. If you’re interrupted during the assembly, make sure you note where you left off so you can pick up from the correct step when you resume. If you’re unsure about a particular step, don’t skip it; instead, refer back to the instructions, online resources, or contact the manufacturer for clarification. By following the steps carefully, you can ensure that your feeder is assembled correctly and will serve you well for a long time in your pig – farming operation.
Post – Assembly Checks
Structural Integrity Check
Once you’ve completed assembling the pig – use stainless steel double – sided feeders, the first post – assembly check is for structural integrity. This step is crucial as it ensures that the feeder can withstand the rigors of daily use on a pig farm. Start by visually inspecting all the joints and connections. Look for any gaps or misalignments that may have occurred during the assembly process. Per esempio, check the areas where the side panels are attached to the base. If there are gaps, it could indicate that the screws are not tightened properly or that the parts were not aligned correctly.
Prossimo, give the feeder a gentle shake or wobble test. Hold the feeder firmly and move it from side to side and front to back. Un pozzo – assembled feeder should feel solid and stable, with no loose parts rattling around. If you notice any movement or hear any strange noises, it’s a sign that there might be an issue with the connections. Go back and re – tighten the relevant screws or nuts. You can also check the anti – deformation support rods to make sure they are firmly in place and providing the necessary support to the feeder structure.
Feed Control Function Test
Testing the feed control function is another important post – assembly step. The feed control device on the pig – use stainless steel double – sided feeders is designed to regulate the amount of feed available to the pigs. Primo, check the adjustment mechanism of the feed control device. Make sure it moves smoothly and that the different settings are clearly marked. Per esempio, if the feeder has a dial – type adjustment mechanism, turn the dial and observe if it rotates freely without any resistance.
Poi, test the actual feed – dispensing function. Pour some feed into the feeder and adjust the feed control device to different settings. Observe how the amount of feed that is released changes. When set to a low – feed setting, only a small amount of feed should be accessible to the pigs. On the other hand, when set to a high – feed setting, more feed should be available. This ensures that you can control the feeding process according to the pigs’ needs, whether they are piglets that require less feed at a time or growing pigs with higher appetites. If the feed control device doesn’t seem to be working as expected, check to make sure the control rod is properly inserted and that there are no obstructions in the feed – dispensing mechanism.
Cleanliness and Hygiene Check
Cleanliness and hygiene are of utmost importance in a pig – farming environment, and a thorough check after assembly is essential. The smooth surface of the stainless – steel construction of the feeder is designed to be easy to clean, but it’s still necessary to ensure that there are no areas where feed or dirt can accumulate. Primo, visually inspect the entire feeder, including the inside of the feed trough, the baffles, and the dividers. Look for any rough spots or crevices that might trap feed.
If you find any such areas, use a soft – bristled brush or a clean cloth to remove any debris. For stubborn dirt or feed residue, you can use a mild detergent and warm water. Tuttavia, make sure to rinse the feeder thoroughly with clean water afterward to remove any traces of the detergent, as it could be harmful to the pigs if ingested. After cleaning, dry the feeder completely before placing it in the pig pen. A clean feeder not only promotes the health of the pigs by reducing the risk of bacterial or fungal growth but also helps to maintain the quality of the feed, ensuring that the pigs are getting the nutrients they need for optimal growth and development.
Conclusion
Recap of the Assembly Process
Assembling pig – use stainless steel double – sided feeders is a process that requires attention to detail. Primo, you need to prepare a clean and flat work area and ensure you have all the necessary tools, such as a screwdriver, wrench, level, and measuring tape, along with materials like screws, nuts, washers, and mounting brackets.
When starting the assembly, carefully unpack and inspect all parts to make sure there is no damage. Poi, begin with the base assembly, attaching the side panels to the bottom chassis securely. Prossimo, install the front and rear baffles to contain the feed. Setting up the feed control device allows you to regulate the amount of feed dispensed, and inserting the dividers helps in organized feeding. Finalmente, adding the anti – deformation support rods is crucial for maintaining the feeder’s shape and durability.
Throughout the process, it’s important to read the instructions thoroughly, keep the parts organized, and check and re – check the connections to avoid common mistakes like incorrect screw tightening, misaligned parts, and skipping steps. After assembly, conduct structural integrity, feed control function, and cleanliness and hygiene checks to ensure the feeder is in optimal condition.

Benefits of a Well – Assembled Feeder
Un pozzo – assembled pig – use stainless steel double – sided feeders offers numerous benefits for pig farmers. Firstly, it helps in reducing feed waste. When the feeder is assembled correctly, the feed control device works as intended, and the baffles and dividers are in place, preventing pigs from scattering or over – consuming feed. This not only saves on feed costs but also ensures that the pigs are fed in a more controlled and efficient manner.
Secondly, a properly assembled feeder promotes better hygiene. The smooth stainless – steel surface, along with a well – assembled structure with no gaps or crevices, makes it easy to clean. This reduces the risk of bacteria, mold, and other contaminants growing in the feeder, which in turn helps keep the pigs healthy. A clean feeder also contributes to the overall cleanliness of the pig pen environment.
Inoltre, an accurately assembled feeder can improve the growth and well – Essere dei maiali. With an evenly distributed and regulated feed supply, all pigs have equal access to nutrients, which is essential for their growth and development. This can lead to more consistent growth rates among the pigs, reducing the likelihood of some pigs being underfed or overfed. In the long run, healthier pigs mean higher yields and more profitability for the pig – farming operation.
Insomma, taking the time to assemble the pig – use stainless steel double – sided feeders correctly is well worth the effort. By following the steps carefully, avoiding common mistakes, and conducting thorough post – assembly checks, pig farmers can ensure that they have a reliable and efficient feeding solution for their pigs, ultimately contributing to the success of their farming business.