
 English
 العربية
 中文(简体)
 Français
 Deutsch
 Italiano
 Polski
 Português
 Русский
 Español
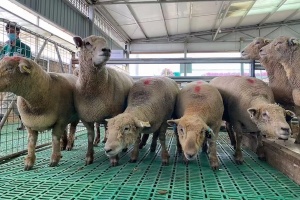
How to Install Sheep Plastic Slatted Floors: A Step-by-Step Guide for Farms
Sheep plastic slatted floors have become a go-to choice for modern livestock operations, offering durability, hygiene, and ease of use that align with efficient sheep farming practices. Unlike traditional concrete or wooden flooring, these specialized panels feature precision-cut gaps that allow manure and urine to pass through, keeping living spaces dry and reducing the risk of disease. They are lightweight yet robust, capable of withstanding the weight of adult sheep and lambs while remaining easy to handle during installation.
Before starting the installation, thorough preparation lays the groundwork for success. First, assess the barn’s existing structure to ensure it can support the flooring system. Measure the dimensions of the pen accurately—length, width, and any irregular angles—to calculate the number of panels needed. Add 5-10% extra to account for cuts or replacements. Next, clear the area of debris, old flooring, or uneven surfaces. Level the subfloor using gravel or concrete if necessary; even a slight slope (1-2%) helps with drainage but avoid steep inclines that might strain sheep. Gather essential tools: a tape measure, circular saw (with a blade designed for plastic), drill, screws, and a rubber mallet. Choosing high-quality, corrosion-resistant fasteners ensures long-term stability, especially in damp barn environments.
Once preparations are complete, begin laying the panels with a focus on alignment and security. Start from one corner of the pen and work outward, placing each panel firmly against the previous one. Ensure the slats run perpendicular to the direction of sheep movement—this design minimizes tripping hazards and optimizes waste passage. Use the rubber mallet to tap panels into place gently; avoid excessive force that could crack the plastic. For larger pens, use joists or support beams spaced 50-60 cm apart to reinforce the flooring. Drill pilot holes before inserting screws to prevent splitting, attaching each panel to the supports at 30 cm intervals along the edges. Pay close attention to gaps between panels: a 1-2 cm space allows for thermal expansion without compromising safety.
After laying the main panels, address edges and openings to create a seamless system. Cut panels as needed to fit around posts, feed troughs, or water stations using the circular saw. Smooth cut edges with sandpaper to eliminate sharp edges that could injure sheep. Install edge trims or rubber edging along the perimeter of the pen to prevent feet from getting caught. For gateways or high-traffic areas, reinforce the flooring with additional supports or thicker panels to handle increased weight. Test the stability by walking across the entire floor; any loose panels should be reattached immediately to avoid accidents.
Post-installation care ensures the flooring maintains its performance over time. Regularly inspect the panels for cracks, warping, or loose fasteners—address issues promptly to prevent further damage. Clean the slats weekly using a pressure washer or brush to remove accumulated manure; avoid harsh chemicals that could degrade the plastic. Every 6-12 months, check the subfloor and supports for moisture or rot, especially in humid climates. With proper maintenance, sheep plastic slatted floors can last 10-15 years, providing consistent value for your farm.
In conclusion, installing sheep plastic slatted floors is a straightforward process that delivers significant returns in animal health and operational efficiency. By following these steps—preparing thoroughly, laying panels carefully, refining edges, and maintaining regularly—farmers can create a clean, safe environment for their flocks. Whether upgrading an existing barn or building a new facility, this flooring solution stands out for its practicality and durability. Invest the time to install it correctly, and you’ll reap the benefits of reduced labor, healthier sheep, and a more productive farm.